Introduction
What is Cloudy Pad ?
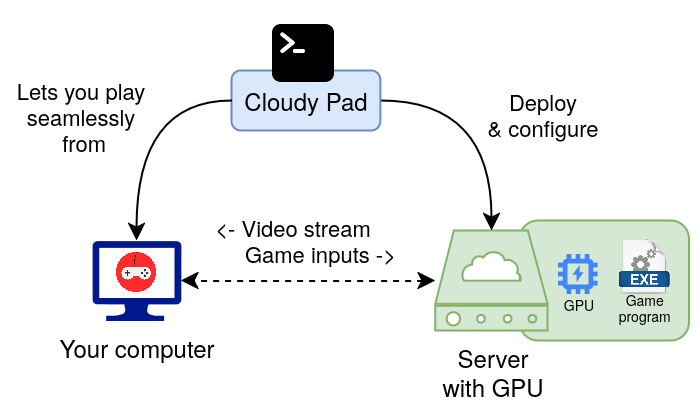
Cloudy Pad lets you deploy a Cloud gaming instance on your own servers, machines or directly in the Cloud (AWS, Azure, Google Cloud, Scaleway…) and play your own Steam, Epic, GOG and other games - without requiring a powerful gaming machine or a costly subscription.
Features ✨
- Supported Games Launchers:
- Turn your own server or machine into a Cloud gaming instance
- Install directly on any server via SSH
- Supported Cloud Providers:
- AWS
- Azure
- Google Cloud Platform (GCP)
- Scaleway
- Paperspace
- Cloud Cost optimisations:
- Setup automated Cost alerts to avoid overspending 💸
- Use Spot instances for up to 90% cheaper instances
- Play 30 hours per month for ~15$ / month or less
- Pay by the hour, no subscription required
- Deploy a Sunshine or Wolf video-game streaming server
- Stream with Moonlight client
Not familiar with Cloud Gaming ? See What’s Cloud Gaming and how is Cloudy Pad useful ?

Getting started
- 🚀 Follow Getting started guide to deploy your Cloudy Pad instance
- 💰 Understand Cloud provider costs - Cloudy Pad itself is free, but Cloud provider usage is not. Make sure you understand Cloud costs before deploying your instance 😉
- Need help ? A question ? Come chat with us on Discord
- 🐛 Found a bug ? Have an issue ? Create an issue on GitHub
Development status 🧪
This project is still at an experimental phase. While working and allowing you to play in the Cloud seamlessly, there may be breaking changes in the future. Your feedback, bug reports and contributions will be greatly appreciated !
How does it work?
See What’s Cloud Gaming and how is Cloudy Pad useful ?
Getting started 🚀
Deploy a Cloud gaming instance using your own servers or directly on a Cloud provider like AWS, Azure or Google Cloud
- 💰 While Cloudy Pad itself is free and open-source, charges may be incurred for Cloud provider usage. Make sure you understand the costs
- Cloudy Pad is Linux-based. Using Steam requires Proton. You can check your game compatibility on ProtonDB website.
Cloudy Pad App
Instructions below are aimed for tech-savvy users who are familiar with terms such as “server”, “ssh” and “NVIDIA drivers”.
If that’s not your cup of tea, you might prefer to use Cloudy Pad App instead: a simple, intuitive web platform to deploy your gaming instance in a few minutes.
- Prerequisites
- Installation
- Choose your Provider
- Deploy your instance
- Stop your instance after gaming sessions
- Problem ?
Prerequisites
- Moonlight streaming client
- Moonlight is client allowing you to connect to your instance and play your games
- Either your own server with an NVIDIA GPU or a Cloud provider:
- AWS
- Azure
- Google Cloud
- Paperspace
- Scaleway
- Docker client
- Rootless Docker is not supported yet
- For MacOS, OrbStack is recommended over Docker Desktop
- A stable internet connection with at least 20 Mbps download speed
Installation
Install latest version of cloudypad CLI:
curl -fsSL https://raw.githubusercontent.com/PierreBeucher/cloudypad/master/install.sh | bash
➡️ See Installation page for more installation methods on Linux, Mac and Windows.
Choose your Provider
Choose a provider:
- SSH - Deploy on your own server or machine directly via SSH
- AWS - Create an instance directly on AWS
- Azure - Create an instance directly on Microsoft Azure
- Google Cloud - Create an instance directly on Google Cloud
- Scaleway - Create an instance directly on Scaleway
- Paperspace - Create an instance directly on Paperspace
➡️ Check out per-Cloud provider setup specificities.
Deploy your instance
Create your instance with cloudypad CLI:
cloudypad create
# How shall we name your Cloudy Pad instance? (default: mypad)
#
# Creating Cloudy Pad instance 'mypad'
#
# [...]
#
# 🥳 Your Cloudy Pad instance is ready !
Cloudy Pad will do everything for you automatically:
- Prompt for important information (you can also pass CLI args)
- Provision and configure your instance
- Install GPU drivers and streaming server (Wolf or Sunshine)
- Help you pair with Moonlight streaming client
Once the installation is complete, run Moonlight, connect and start playing ! 🎮
➡️ Moonlight usage and optimization guide
Stop your instance after gaming sessions
Once you are done, remember to stop your instance to avoid unnecessary costs 💸
cloudypad stop mypad
# or
# cloudypad destroy mypad
Problem ?
😱 Something went wrong? See Help and Troubleshooting section on the left, FAQ and known issues or create an issue
What’s Cloud Gaming ? How is Cloudy Pad useful ?
This page is aimed at non-technical people or those unfamiliar with Cloud Gaming who want a better understanding of what Cloudy Pad can provide. We’ll explain:
- What’s “Cloud gaming” ?
- What is Moonlight and how is it related to Cloud Gaming ?
- What is a Cloud provider ?
- What is Docker and why do we need it ?
- What is the
cloudypadCLI ?
Cloud Gaming is the act of playing video games directly from a server on the internet. This is called “Cloud Gaming”. Our goal is to make Cloudy Pad usable by even non-tech-savvy users. While we’re not there yet, we hope this page will help you have a better understanding.
Cloud Gaming
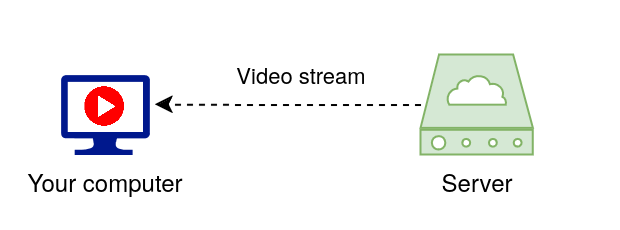
Cloud gaming lets you play video games without needing a powerful console or computer at home. Think of it like streaming a movie on YouTube or Netflix: you open your browser and watch a video. In this case, the video comes from YouTube’s servers to your computer. The server does the heavy work of generating images for the video, while you only get the result as a video stream.
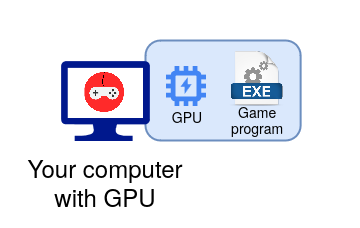
To play video games, you need lots of physical resources, more than what’s required to generate a ‘simple’ video stream like YouTube. That’s why dedicated consoles or ‘gaming’ computers are often required for recent games. This includes powerful GPUs (Graphical Processing Units) to generate the video stream for video games. In a classic setup, your GPU is physically located in your machine.
With Cloud Gaming, GPU power is delegated to a computer somewhere on the internet - in the Cloud - while you get the video game stream as a result.
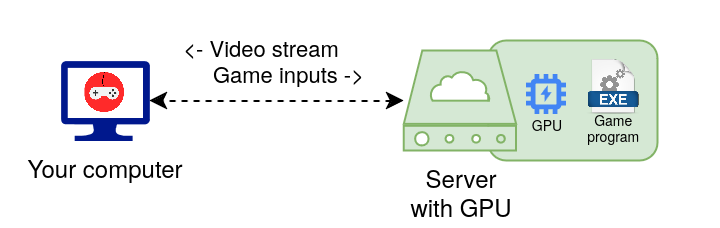
Therefore, you don’t need a powerful computer at home anymore, just something capable of handling a video stream and a good internet connection. It lets players enjoy games without requiring a high-end computer and occasional players can enjoy games without huge investment in costly material.
How do we get such a server in the Cloud? See Cloud Provider below.
Moonlight
Moonlight is to Cloud Gaming what your browser (Firefox, Safari, Chrome…) is to YouTube: it allows you to connect to a server to play video games while your browser lets you connect to YouTube to watch videos. You install and run it like any other program !
Moonlight is called a Client which will connect to our Server.
Cloud Provider
A Cloud Provider allows you to rent Servers in the Cloud. Much like you’d rent a car for your holidays at a daily fee, Cloud Providers let you rent Servers for an hourly fee. With Cloud Gaming, we’re going to rent a server in order to play our games.
You may have already heard of Cloud Providers such as AWS, Google Cloud, Microsoft Azure, etc. Cloudy Pad lets you (or will let you) play on these Cloud Providers and others, less known but cheaper, more adapted to our usage.
CLI and console
CLI (short for Command Line Interface) allows you to run commands in a terminal (a small window in which you can type text). This is a basic but very powerful way of running programs, and the primary way to run Cloudy Pad, which does not (yet) have a graphical interface like your browser would.
Don’t worry, the cloudypad CLI is easy to use and you’ll be guided through usage.
Docker
Docker is a tool required by Cloudy Pad to work. While it may seem strange to rely on yet-another technology to run Cloudy Pad, this allows Cloudy Pad to actually be much simpler to install and use, preventing you from installing quite a lot of software and applications.
How does it all fit in ?
Here’s the thing: deploying a Cloud Server with everything you need to play video games is… a bit complex, to say the least. This documentation may seem like a lot already, but it’s only scratching the surface.
That’s where Cloudy Pad comes in ! Cloudy Pad lets you:
- Create a Cloud Server suitable for video games and Cloud Gaming using the Cloud Provider of your choice 🪄
- Configure your Cloud Server and Moonlight with all you need to stream video games ✨
- Manage your server lifecycle: create, start/stop, destroy… 🤖
- Avoid the complexity of installing and configuring lots of complicated software, Cloudy Pad does it for you with Docker ! 🚀
Cloudy Pad features
Supported game launchers
✅ Native stable launchers:
- Steam - Steam client is installed natively on Cloudy Pad with a recent Proton version pre-configured.
- Heroic - Heroic Games Launcher is installed natively on Cloudy Pad and let you play games from:
- Epic
- GOG
- Amazon Prime Games
✅ Other stable launchers:
Experimental launchers:
- Lutris - Lutris is natively installed on Cloudy Pad, but is currently experimental and may require additional technical skills to configure
Supported Cloud Providers and features
Supported Cloud providers, their smplementation status and features
| Provider | Status | Data Disk Snapshot | Base Image on init/update | Cost Alerts | Auto Stop | IPv6 Support |
|---|---|---|---|---|---|---|
| AWS | ✅ stable | ✅ | ✅ | ✅ | ✅ | |
| Azure | ✅ stable | ✅ | ✅ | ✅ | ✅ | |
| GCP | ✅ stable | ✅ | ✅ | ✅ | ✅ | |
| Scaleway | ✅ stable | ✅ | ✅ | ✅ | ||
| Linode | ℹ️ experimental | ✅ | ✅ | |||
| Paperspace | ⚠️ deprecated | ✅ | ||||
| SSH | ✅ stable | Not applicable | Not applicable | Not applicable | ✅ |
Cloud Provider features
All features are more or less related to Cost Efficiency 🤑
- Data Disk Snapshot: Snapshot instances’s data disk on stop to reduce infrastructure cost.
- Snapshot are cheaper than plain data disk / volumes
- Data disk / volume is restored from snapshot on start
- Base Image on Init/Update: Create a base image on instance initialization and update
- Keeping instance image is cheaper than keeping the instance and its OS/root disk on stop
- Instance and OS / root disk is deleted on stop and re-created from base image on start
- Cost Alerts: Automated cost monitoring and email alerts when spending reaches configured thresholds
- Avoid accidental spending and keep controler of what you spend
- Auto Stop: Automatic shutdown of instances when inactivity is detected (eg. stop instance after 15 min of inactivity)
- Prevent your instance from costing money while not in use of if you go AFK
- IPv6 Support: Support for IPv6 networking and addressing
- IPv4 are billed 1$ to 2$ / month on most Cloud providers. IPv6 is free !
- Not supported yet: coming soon!
Supported Streaming servers
Stream with Moonlight client from one of of these streaming server:
- Sunshine - low-latency, cloud gaming server capabilities with support for AMD, Intel, and Nvidia GPUs for hardware encoding.
- Wolf - open source streaming server for Moonlight that allows you to share a single server with multiple remote clients in order to play videogames!
Cloudy Pad Roadmap
Next big features and improvements
Cloudy Pad App - Done 07-2025
Cloudy Pad App will provide a way to deploy and manage gaming instances using a non-technical user friendly platform.
Start playing now on Cloudy Pad App !
Cost reduction: OS Disk snapshot
On stopping your instance, a disk snapshot will be made instead of keeping disk as-is. On next usage, instance will be restored from snapshot.
As snapshots are generally cheaper than disks it will provide a great cost reduction.
Cost reduction: Data move to S3 on stop (or cheap Cloud storage)
On instance stop, instead of keeping data disk (and being billed for it), your data will be moved to an S3 bucket (or equivalent storage) which is much cheaper. On next usage S3 data will be moved back to data disk.
Additional game launchers on Sunshine: Lutris, Epic, Heroic and more
Only Steam is supported on Sunshine for now. Cloudy Pad will soon support additional game launchers like Lutris, Epic, Heroic and more !
CLI Installation and Upgrade
Requirements for all OS
- A Cloud provider account, one of:
- AWS
- Azure
- Google Cloud
- Paperspace
- Scaleway
- Moonlight streaming client
- Docker
- Rootless Docker is not supported yet
- For MacOS, OrbStack is recommended over Docker Desktop
Installation
Linux
Install latest version of cloudypad CLI:
curl -fsSL https://raw.githubusercontent.com/PierreBeucher/cloudypad/master/install.sh | bash
MacOS
Install latest version of cloudypad CLI:
curl -fsSL https://raw.githubusercontent.com/PierreBeucher/cloudypad/master/install.sh | zsh
OrbStack is recommended over Docker Desktop as it’s more compatible for Cloudy Pad usage.
Windows
Running Cloudy Pad on Windows requires WSL to be installed.
Once WSL is installed, run a Linux shell and follow Linux installation steps.
Note: If you are using SSH keys mounted from Windows host, make sure they have proper permissions: chmod 0600 ~/.ssh/<key>
Nix / NixOS
Cloudy Pad is packaged as a Nix Flake, see flake.nix
You can include it in your NixOS config or run directly with nix run:
nix run github:PierreBeucher/cloudypad create
nix run github:PierreBeucher/cloudypad -- --version
Upgrade
To upgrade to the latest version of cloudypad, run the installation process again. It will check for the latest version and install it.
Then, upgrade your instance(s) to get latest changes with:
cloudypad provision my-instance
cloudypad configure my-instance
Cloudy Pad will do its best to provide retrocompatibility, but some feature may remain disabled if you’re upgrading from an older version.
See Upgrade guide to enable new features on existing instances after upgrade.
cloudypad CLI usage
Global usage
Available commands:
$ cloudypad --help

Usage: cloudypad [options] [command]

Cloudy Pad CLI to manage your own gaming instance in the Cloud.

Options:
  -v, --verbose               Verbosity level (0: silly, 1: trace, 2: debug, 3: info, 4: warn, 5: error, 6: fatal). Alternatively, use
                              CLOUDYPAD_LOG_LEVEL environment variable.
  -V, --version               output the version number
  -h, --help                  display help for command

Commands:
  create                      Create a new instance. See subcommands for each provider options.
  update                      Update an existing instance. See subcommands for each provider options.
  list [options]              List all instances
  start [options] <name>      Start an instance
  stop [options] <name>       Stop an instance
  restart [options] <name>    Restart an instance. Depending on provider this operation may be synchronous.
  get <name>                  Get current state of an instance and its status (running, provisioned, configured, ready)
  provision [options] <name>  Provision an instance (deploy or update Cloud resources)
  configure [options] <name>  Configure an instance (connect to instance and install drivers, packages, etc.)
  deploy [options] <name>     Deploy an instance: provision and configure it. Equivalent to running provision and configure commands sequentially.
  destroy [options] <name>    Destroy an instance
  pair <name>                 Pair an instance with Moonlight
  help [command]              display help for command
Create instances
Use cloudypad create. It will prompt for required parameters depending on your Cloud Provider.
cloudypad create

# Or for a specific provider
cloudy pad create azure
cloudy pad create aws
cloudy pad create gcp # Google
cloudy pad create paperspace
cloudy pad create scaleway
You can also specify all arguments as flags for non-interactive creation, for example:
cloudypad create aws \
  --name $instance_name \
  --instance-type g4dn.xlarge \
  --disk-size 100 \
  --public-ip-type static \
  --region eu-central-1 \
  --spot \
  --streaming-server [sunshine|wolf] \
  --cost-alert [disable|no|false|0] \
  --cost-limit 40 \
  --cost-notification-email me@example.com \
  --ratelimit-max-mbps 40 \
  --yes --overwrite-existing
Use cloudypad create <provider> --help for available flags.
Use instances: start, stop, list, get
List existing instances:
cloudypad list
Get instance details:
cloudypad get mypad
Start/stop/restart instance:
cloudypad start mypad
cloudypad stop mypad
cloudypad restart mypad
By default instance stop/start/restart triggers the action without waiting. Wait for action to finish with --wait (and optionally timeout <seconds>)
cloudypad [start|top|restart] mypad --wait --timeout 180
Update instances
To update your instance to latest version:
- Upgrade your Cloudy Pad installation - see CLI Installation and Upgrade
- Then update your instance with:
cloudypad deploy my-instance
deploy will provision and configure your instance with latest Cloudy Pad version.
Destroy instances
Destroy instance:
cloudypad destroy mypad
A confirmation prompt will appear by default, you can skip with:
cloudypad destroy mypad --yes
Instance deployment lifecycle
When you create your instance, creation process goes through various steps:
- Provisioning: create all Cloud resources for your instance (virtual machine, IP address, virtual disk…)
- Configuration: install required packages and softwares on your instance (eg. Wolf server)
- Pairing: pair your instance with Moonlight
These actions can be performed directly via commands below.
Provision an instance to create/update Cloud resources for your instance.
cloudypad provision mypad
Run instance configuration:
cloudypad configure mypad
Pair Moonlight with an existing instance:
cloudypad pair mypad
Environment variables
Cloudy Pad built-in environment variables
Environment variables used by Cloudy Pad and example values
# Log level. Also exposed via CLI --verbose flag.
# 0: silly, 1: trace, 2: debug, 3: info, 4: warn, 5: error, 6: fatal
CLOUDYPAD_LOG_LEVEL=3

# Set -x bash flag to show all commands executed by launcher script
CLOUDYPAD_CLI_LAUNCHER_DEBUG=1

# Home directory for Cloudy Pad data
CLOUDYPAD_HOME=~/.cloudypad

# Cloudy Pad version to use for launcher.
# Beware: changing this value will change Cloudy Pad container image used
# which may not be compatible with launch version installed
CLOUDYPAD_VERSION=0.7.0

# Override Cloudy Pad container image used by launcher
CLOUDYPAD_IMAGE="crafteo/cloudypad:$CLOUDYPAD_VERSION"
Other environment variables
Cloudy Pad relies on external tools and libraries like AWS library and Ansible to manage your instances. Some variables can set to alter behavior.
See env_vars variable in launcher script for details.
Global configuration
A global configuration is saved under $HOME/.cloudypad/config.yml. Later version will add commands to manipulate this configuration.
Moonlight setup and pairing guide
Cloudy Pad requires Moonlight streaming client to connect to your instance.
Install Moonlight
Moonlight is available Windows, MacOS and Linux.
See Moonlight installation instructions for other installation methods.
Run Moonlight and connect to your instance
Pairing is done automatically when you run cloudypad create.
If needed, can pair your instance using Cloudy Pad CLI:
cloudypad pair my-instance

# Run this command in another terminal to pair your instance:
#
#   moonlight pair 35.181.136.176 --pin 1234
Mac and Apple specificities
Some Mac / Apple device may prevent Moonlight to pair on non-local address. To workaround this, use an IPv6 address instead of the default IPv4 address when pairing by prefixing with [::ffff:[YOUR_IP]].
For example this IPv4
200.123.4.56
Becomes Ipv6
[::ffff:200.123.4.56]
Streaming servers: Sunshine and Wolf
Choose your streaming server
Cloudy Pad supports two streaming servers:
You can choose between them when creating your instance on prompt or by passing --streaming-server [sunshine|wolf] flag to cloudypad create.
Sunshine
Sunshine is a modern streaming server that supports a wide range of games and is known to be very stable. It provides a web interface to manage configuration.
Accessing web interface and configuration
For security reasons Sunshine interface is not exposed on the internet. You must run an SSH tunnel to access it:
Get your instance IP address:
cloudypad get <instance-name>
Showing something like this:
{
  "provision": {
    "ssh": {
      "user": "ubuntu", //<USER>
      //[...]
    },
    "output": {
      "host": "10.234.56.78", // <INSTANCE_IP>
    },
    // [...]
  },
  "configuration": {
    "input": {
      "sunshine": {
        "passwordBase64": "c3Vuc2hpbmU=",
        "username": "sunshine"
        // [...]
      }
    }
  }
}
Decode base64 password:
echo "c3Vuc2hpbmU=" | base64 -d
# sunshine
Run an SSH tunnel:
ssh -L 47990:localhost:47990 <USER>@<INSTANCE_IP>
Open your browser and go to https://localhost:47990. Sunshine’s default certificate will probably not be trusted by your browser as it’s self-signed, you can safely ignore this error.
Use login/password entered during instance creation, also shown by cloudypad get <instance-name>.
Note: future versions of Cloudy Pad will either
- Allow secure remote access via internet with valid HTTPS (TLS) certificate
- Provide more automation to run SSH tunnel for you
Wolf
Wolf is a Moonlight-compatible streaming server. Main features include allowing multiple users to stream from the same instance and sharing a single GPU with multiple games.
Auto Stop: inactivity detection and automatic shutdown
Inactivity detection (Auto Stop) automatically shuts down your instance when no activity is detected to avoid overcost.
Instance is considered inactive when all these conditions are met:
- You’re not connected via Moonlight
- You’re not downloading a game (no significant incoming network activity is detected)
- You’re not updating the instance using
cloudypadcommands likecloudypad configure(to avoid interrupting instance during configuration or updates)
Configuration
Enabling/disabling Auto Stop is done on instance creation via cloudypad create <provider> --autostop-enable=[true|false] --autostop-timeout <seconds> or interactive prompt.
To change configuration post-creation use cloudypad update, for example:
cloudypad update <provider> --name <my-insytance> --autostop-enable true --autostop-timeout 600
How it works
Auto Stop regularly check for:
- Moonlight activity on port 47999 (Control Port).
- Network download activity
- Ansible process activity used by
cloudypadcommands likecloudypad configure(to avoid shutting down instance during configuration or updates)
If no activity is detected within the configured timeout, Auto Stop will shut down the instance.
Auto Stop is installed as systemd service cloudypad-autostop. You can stop/start and get logs with:
sudo systemctl stop|start|status cloudypad-autostop
sudo journalctl -u cloudypad-autostop -f
Connect via SSH to instance
Your instance specify an SSH user and either a key path or base64-encoded content.
$ cloudypad get mypad
{
  "name": "mypad",
  "host": "1.123.45.xxx", <==== Instance IP
  "ssh": {
    "privateKeyPath": "/home/crafteo/.ssh/id_ed25519",
    # OR
    "privateKeyContentBase64": "...KeyContentAsVeryLongString...",
    "user": "ubuntu"  <===== SSH user
  },
  # ...
}
If your instance uses privateKeyContentBase64 (a base64-encoded private SSH key), decode it and use it with ssh. For example:
# Create a file only current user can access to write our key in
touch /tmp/my-instance-key
chmod 0600 /tmp/my-instance-key

# Decode key into our file
cloudypad get mypad | jq -r .provision.input.ssh.privateKeyContentBase64 | base64 -d > /tmp/my-instance-key
# Note: jq is a JSON parser you may need to install
# Otherwise copy/paste key content and use echo directly such as
# echo "...KeyContentAsVeryLongString..." | base64 -d > /tmp/my-instance-key

# Connect to instance using key
ssh -i /tmp/my-instance-key ubuntu@1.123.45.xxx
If your instance uses a key path, you can use it directly:
ssh -i /home/crafteo/.ssh/id_ed25519 ubuntu@1.123.45.xxx
SSH - Deploy on your own server
Use SSH provider to transform your own machine or server into a Cloud gaming instance.
SSH Provider is still experimental 🧪
SSH provider is freshly from the oven and may have some limitations or bugs. Please Create an issue or reach us on Discord if you encounter problems.
Pre-requisites
Server specs and requirements
- Fresh installation of Ubuntu 22 or Ubuntu 24
- Reachable via SSH (private key or password)
- Hardware: minimum 4 CPU - 8GB RAM
- Smaller specs might work but performances won’t be ideal
- GPU type: NVIDIA (both consumer-grade like RTX 4090 and professional-grade like L4 are supported)
- Make sure no NVIDIA driver are already installed or uninstall existing drivers beforehand as Cloudy Pad currently support specific set of NVIDIA versions and existing driver installation may conflict with expected ones.
- Trying to install Cloudy Pad on non-Ubuntu servers (like Debian) may work but isn’t officially supported yet
- Localhost installation is not supported yet (running Cloudy Pad installation from the same machine you are targetting) as your machine will reboot multiple times during installation process, in which case the installation process would be interrupted
- Make sure to run deployment from another machine from the one you are targetting
Using SSH provider
Make sure to have the SSH key or password on hand and run:
cloudypad create ssh
Provider setup
Providers are methods used by Cloudy Pad to deploy gaming instances.
Supported providers:
- SSH - Deploy on your own server or machine directly via SSH
- AWS - Create an instance directly on AWS
- Azure - Create an instance directly on Microsoft Azure
- Google Cloud - Create an instance directly on Google Cloud
- Scaleway - Create an instance directly on Scaleway
- Paperspace - Create an instance directly on Paperspace
Typical needs for Cloud providers (all but SSH):
- Create your Cloud provider account - If not already done, you’ll need to create an account on the Cloud provider you want to use.
- Configure your Cloud provider credentials - they are required by Cloudy Pad to create your instance.
- Define Quotas allowing you to deploy GPU - Most Cloud providers require a “quota increase” before allowing you to deploy GPU instances suitable for Cloud gaming.
- Profile verification - for new accounts, some Cloud provider may require some kind of verification.
Note: future version of Cloudy Pad will automate away most of this setup for you.
AWS provider setup
If you don’t already have an AWS account, create an account or use an existing account.
Configure your credentials locally (see official documentation)
Check your configuration:
$ aws sts get-caller-identity
{
    "UserId": "AID...YOUR_USER_ID",
    "Account": "123456789",
    "Arn": "arn:aws:iam::123456789:user/crafteo"
}
You’re good to go ! Create your instance with
cloudypad create
Quotas
You may need to increase quota to create the related instance type. If you get an error related to quota:
- Go to AWS EC2 quota console (or search for “Quota” in the AWS console and go to Amazon Elastic Compute Cloud (Amazon EC2) quota page)
- For Spot instances: search for All G and VT Spot Instance Requests (or the related instance type) and request a quota increase
- For On-Demand instances: search for Running On-Demand G and VT instances (or the related instance type) and request a quota increase
- Use a quota value according to the instance type you want to use. For example,
2xlargerequires at least 8 vCPU.
See AWS service quotas for details.
Azure provider setup
If you don’t already have an Azure account, create an account or use an existing account.
Configure your credentials locally (see official documentation)
Check your configuration:
$ az account list
[
  {
    "cloudName": "AzureCloud",
    "homeTenantId": "xxx",
    "id": "xxx",
    "isDefault": true,
    "managedByTenants": [],
    "name": "My Azure Subcription",
    "state": "Enabled",
    "tenantId": "xxx",
    "user": {
      "name": "you@example.com",
      "type": "user"
    }
  }
]
Quotas
You may need to increase quota to create the desired instance type. If you get an error related to quota:
- Go to Azure Quota dashboard and or search for “Quota”
- Go to Compute > filter for your Subscription / Location and search for NC, NC or the instance type prefix you want to use
- Click on quota name and New Quota Request
- Fill-out the quota request and submit
Quota is usually accepted within 24 to 48h.
See:
- Azure Quota doc
- Your Azure quota dashboard (search for “Quota”)
Google Cloud provider setup
If you don’t already have a Google Cloud account, create an account or use an existing account.
Configure your credentials locally (see official documentation)
⚠️ You must authenticate using Application Default Credentials such as:
$ gcloud auth application-default login
Otherwise Google API won’t be able to use “classic” gcloud auth login credentials.
Quotas
You may need to increase quota to create the desired instance type. If you get an error related to quota, see:
- Google Cloud Quota doc to update your quotas.
- Your account Quota dashboard
Paperspace provider setup
ℹ️ Cloudy Pad Paperspace provider is deprecated. No new feature will be added and support will be dropped in a later version.
If you don’t already have a Paperspace account, create an account.
If you haven’t already setup an SSH key in your profile:
- If needed, generate an SSH key with
ssh-keygen -t ed25519 -a 100 - Log into your account and go to Your account > SSH Keys > Add new SSH key to add your key. (see doc for details)
You’ll need an API key to create your instance:
- Go to Team settings > API Keys > Add (see doc for details)
You’re good to go ! Create your instance with
cloudypad create
Scaleway provider setup
If you don’t already have an Scaleway account, create an account or use an existing account.
Configure your credentials using scw CLI, see official documentation
Check your configuration:
scw info
You do not need additional configuration appart, maybe, a Quota increase (see below). SSH key needed to access the instance will be configured by Cloudypad.
Quotas
You may need to increase quota to create the desired instance type. If you get an error related to quota:
- Go to Scaleway Quota dashboard
- Search for “GPU” and identify the quota you need to increase
- Fill a quota increase request
Steam
Run Steam
Launch your instance and connect using Moonlight. Click Steam icon in Moonlight to connect and start Steam.
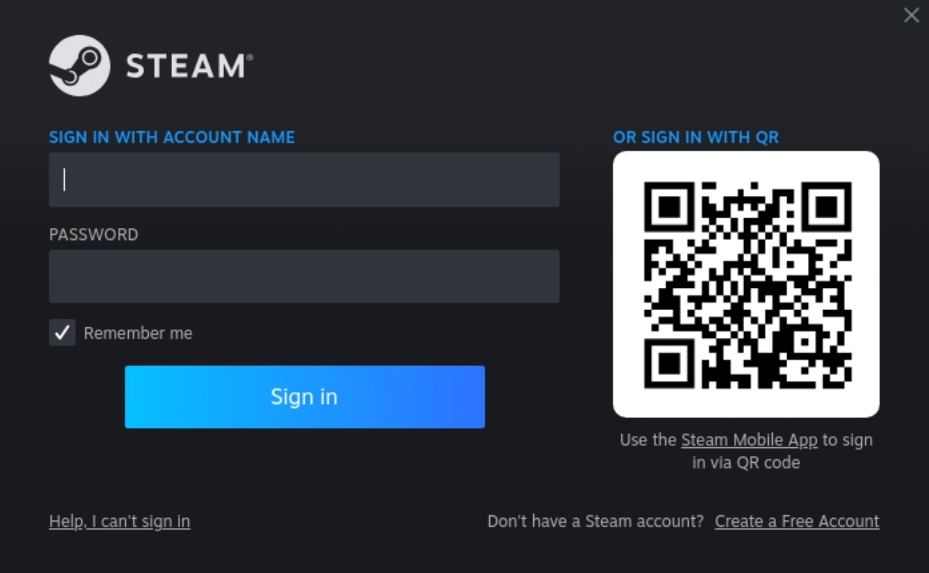
Sign in to Steam
Steam welcome screen shows a login with a QR code and a login/password prompt.
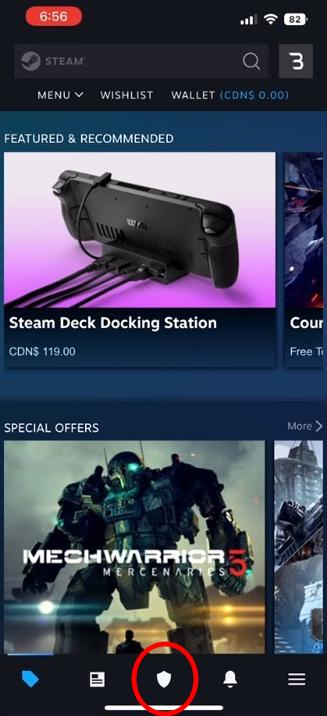
(Recommended) Mobile app with Steam Guard
See Steam Guard Mobile Authenticator to setup Steam guard for your account
Then use your phone or tablet to:
- Download Steam application and sign in to the app
- Tap on the shield 🛡️ button at the bottom of the screen
- Scan the QR code shown by Steam on Moonlight
Password authentication
Note: password authentication may fail as Steam does not recognize your server location. It’s recommended to use Mobile app with Steam guard.
You can enter your Steam login and password directly
Note: it may be possible to copy/paste your password from host using CTRL+ALT+SHIFT+V on Linux/Windows or Command+ALT+SHIFT+V on MacOS, but a known issue may prevent it from working
I forgot my Steam username and/or password
On your phone or tablet download Steam application and:
- Select “I need help signing in” at bottom left
- Select “I forgot my Steam account name or password”
- Enter your email address or phone number and click on “Continue”
- Follow instructions to reset your password
Advanced configuration
Steam data path
From within Cloudy Pad, Steam data are located under:
/cloudy/data/Steam/cloudy/conf/steam$HOME/.steam
If you’re connected directly on host via SSH, see under /var/lib/cloudypad/sunshine/.
Configuring Mods
Configuring Steam mods vary with games. If you need to install files locally, look under /cloudy/data/Steam/steamapps/common/
Change Proton version
Proton provide compatibility with Windows games. Sometime using a different Proton version may help run a game or fix bugs.
Go to Steam > Settings > Compatibility > Default compatibility tools and chose a more recent (higher number) Proton version, or Proton Experimental for latest experimental version.
Epic
Run Epic
Epic is run via Heroic Games Launcher.
Launch your instance and connect using Moonlight. Select Heroic icon in Moonlight to connect and start Heroic Games Launcher.
On Heroic main menu window:
- Click on Log in left menu and select Epic Games Login
- Connect using your usual connection method
Your Epic games will now appear in Library. Install them and start playing !
Additional Heroic Games Launcher setup
See Heroic Games Launcher setup page.
GOG
Run GOG
GOG is run via Heroic Games Launcher.
Launch your instance and connect using Moonlight. Select Heroic icon in Moonlight to connect and start Heroic Games Launcher.
On Heroic main menu window:
- Click on Log in left menu and select GOG
- Connect using your usual connection method
Your GOG games will now appear in Library. Install them and start playing !
Additional Heroic Games Launcher setup
See Heroic Games Launcher setup page.
Heroic Games Launcher
Run Heroic Games Launcher
Launch your instance and connect using Moonlight. Click Heroic Games Launcher icon in Moonlight to connect and start Heroic.
Connect to your Game Launcher account and start playing
- Click on Log in left menu and select your Game Launcher
- Connect using your usual connection method
Your games will now appear in Library
Additional setup steps
Some games require additional setup. See Heroic Games additional page
Microsoft Visual C Runtime
Some games require Microsoft Visual C++ Runtime installation. A message will show The following components are required to run this program: Microsoft Visual C++ Runtime.
See Heroic: Installing Visual C Runtime
Proton and Wine versions
Heroic Games Launcher is pre-configured on Cloudy Pad with GE-Proton. You can add more Wine and Proton versions via settings.
Additional documentation and help
You can find additional Heroic documentation, help and setup guide on Heroic Wiki
Local data path
Heroic data are stored under
/cloudy/conf/heroic- Heroic configurations/cloudy/data/heroic~/.local/state/Heroic/- Game logs
If you’re connected directly on host via SSH, see under /var/lib/cloudypad/sunshine/.
Lutris
Run Lutris
Launch your instance and connect using Moonlight. Click Lutris icon in Moonlight to connect and start Lutris.
Using Lutris
Lutris comes with a pre-installed Wine version and should work out of the box for most runners, including:
- Epic
- GOG
- Ubisoft Connect
- Battle.net
And more !
Installing a Game launcher (Lutris Runners)
Click on hamburger menu on top-right and select Add Games > Search Lutris website and search for the launcher you want to add. For example:
- Battle.net
- Ubisoft Connect
Follow through installation procedure and connect to your account to access your library.
More on Lutris website
Lutris official website can provide more information and usage specificities:
Amazon Prime Games
Run Amazon Prime Games
Amazon Prime Games is run via Heroic Games Launcher.
Launch your instance and connect using Moonlight. Select Heroic icon in Moonlight to connect and start Heroic Games Launcher.
On Heroic main menu window:
- Click on Log in left menu and select Amazon Games
- Connect using your usual Amazon account credentials
Your Amazon Prime Games will now appear in Library. Install them and start playing !
Additional Heroic Games Launcher setup
See Heroic Games Launcher setup page.
Moonlight: install and connect
Download and install Moonlight
Moonlight is available for:
See Official Moonlight website for more information.
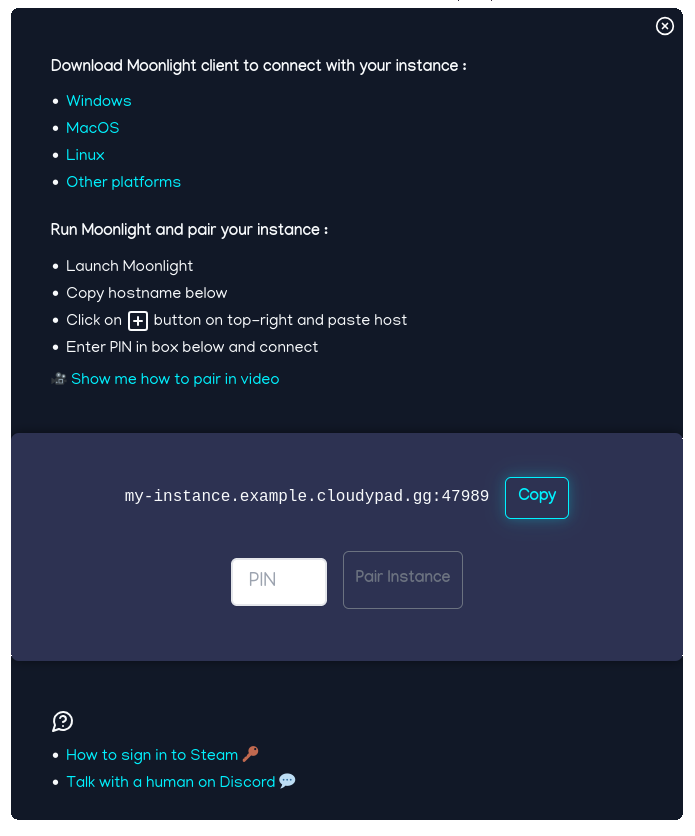
Connect to your instance
Cloudy Pad Platform
Cloudy Pad platform lets you create instances via a web interface.
After creating your instance, to go My Instances, click on Connect and follow instructions on screen
Cloudy Pad Community
Pairing is done automatically when you run cloudypad create.
If needed, can pair your instance using Cloudy Pad CLI:
cloudypad pair my-instance

# Run this command in another terminal to pair your instance:
#
#   moonlight pair 35.181.136.176 --pin 1234
Moonlight usage and configuration
See Moonlight usage: screen size, latency, keyboard shortcuts, etc.
Moonlight usage: screen size, latency, keyboard shortcuts, etc.
- How to exit Moonlight session
- Display / screen resolution
- Latency, stutter and image quality: FPS and bitrate
- Moonlight keyboard shortcuts
- See also
How to exit Moonlight session
Press:
- PC / Windows keyboard :
CTRL+ALT+SHIFT+Q - MacOS keyboard:
SHIFT+CONTROL+OPTION+Q
Display / screen resolution
Moonlight screen resolution may be different than your actual screen. By default Moonlight is configured to use a 720p resolution (1280x720) which may be lower than your actual screen.
If you experience blurry image and/or improperly scaled image, Moonlight resolution may be improperly set.
To set Moonlight display resolution:
- Open Moonlight client.
- If already connected to your instance in Moonlight, exit your session and click Stop button to fully disconnect.
- Open Settings ⚙️ (top-right gear button).
- Under “Resolution and FPS” choose your desired resolution. Use the following values:
Nativeto match your current screen resolution1080pfor1920x1080screen resolution4kfor3840x2160screen resolution
Known limitations:
- NVIDIA Datacenter GPUs maximum resolution is 2560x1600. Resolution will automatically be adjusted to fit your screen but may be smaller as it will be capped at 2560x1600. See #144.
Latency, stutter and image quality: FPS and bitrate
Moonlight has a “FPS” and “Bitrate” limit. Setting these values may improve your connection quality / latency:
If you experience lag, stutter or warnings while streaming:
- Open Moonlight client.
- If already connected to your instance in Moonlight, exit your session.
- Open settings ⚙️ (top-right gear button).
- Decrease bitrate by ~10% to 30%.
- Slightly lower quality but better latency for slower internet connections.
- Decrease FPS (eg. 60 FPS => 40 FPS)
- FPS is “Frame per second”. Lower FPS means less data to sent but slightly lower quality.
- Decrease resolution (eg. 1080p => 720p)
- Lower resolution means less data to sent but slightly lower quality.
Moonlight keyboard shortcuts
PC / Windows keyboard:
- Exit session:
CTRL+ALT+SHIFT+Q - Show statistics (FPS, latency, etc.):
CTRL+ALT+SHIFT+S - Windowed mode:
CTRL+ALT+SHIFT+X
MacOS keyboard:
- Exit session:
SHIFT+CONTROL+OPTION+Q - Show statistics (FPS, latency, etc.):
SHIFT+CONTROL+S - Windowed mode:
SHIFT+CONTROL+OPTION+X
See also
Common configuration while Streaming

You can configure your keyboard and mouse after connecting with Moonlight using bottom toolbar Keyboard and Mouse icons.
Keyboard configuration and layout
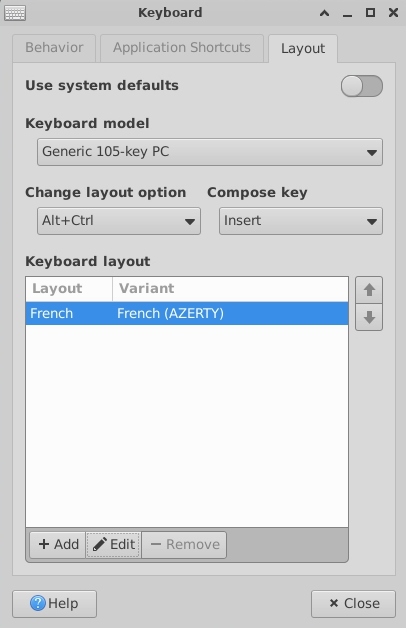
Click on keyboard icon at the bottom of screen:
- Go to Layout tab
- Disable system default by unchecking System default on top right
Then change your configuration:
- Layout: correspond to the first keys on your keyboard. Eg. if the first keys are A-Z-E-R-T-Y, use should
AZERTYlayout.- In Keyboard layout box, Click on current layout and Edit. Select your layout.
- Model:
- Windows: use Generic PC-104 or PC-105
- MacOS: use Macbook or Macintosh
- Linux: use Generic PC-104 or PC-105
- If none of the above work, try to find your keyboard manufacturer in the list
Mouse configuration
Set your mouse configuration (eg. pointer speed) after connecting with Moonlight: click on the Mouse icon at the bottom of the screen. Adapt configurations as per your needs.
Performance and setup tips
Recommandations for best performance and gaming experience
Moonlight performance settings
Make sure to configure Moonlight according to your internet speed and requirements, especially Bit rate and FPS. See Moonlight usage for details.
Internet connection speed
Ensure your internet speed is at least 20 Mpbs download.
You can use Speed Test to check your connection
Prefer Wired (ethernet) other Wifi
Prefer a wired internet connection (ethernet cable), especially if you have latency or stutters using Wifi. While most Wifi connection will perform fine, you may encounter frame drops.
Using Wifi, depending on the physical location of your router (eg. behind a door, signal blocked my some components, etc.), you may encounter bad performance.
Playing from mobile (4G / 5G)
It’s possible to play other 4G and 5G mobile connection, though performance may not be ideal. Some users reported smooth experience while it was unplayable for others.
Be careful with data plan using a mobile connection: Cloud Gaming consumes lots of data which may cause your carrier to rate limit you or a huge data transfer bill. Make sure you understand how your data plan works.
Some carriers are known to block Cloud Gaming protocols which would prevent you from playing. Use a Wifi or wired ethernet connection instead.
Running sudo and root commands
It’s possible to run sudo and commands as root in Cloudy Pad, but there are some important limitations as changes you make may not persist.
sudo and root command limitations
Changes made with sudo or as root user may no persist, for example an apt package installed once
may not be available the next time you run your instance. Here’s why:
Cloudy Pad runs inside a container. This means that any packages you install or system updates you make outside of standard usage may NOT persist: the container may be re-created every time your instance starts or when you make a Cloudy Pad version upgrade.
If you know what you are doing, go ahead! We’d actually love to hear about your sudo use cases: share them on Discord or GitHub so we can consider integrating them natively in Cloudy Pad.
Keep in mind sudo commands can break things and we may not be able to provide support for issues caused by sudo-related usage.
Persisting data
Persistent data can be stored under $XDG_DATA_HOME, this folder and its content will persist across sessions. It contains your games and user data - be careful not to break anything important!
Get your sudo password
To get your sudo password in Cloudy Pad:
- Right click on desktop and run a terminal
- Run command:
get-cloudy-password
Join the community to get help
Join our Discord server to get help from the community !
General FAQ
FAQ
- FAQ
- What are the recommended GPU and specs for my instance ?
- I can’t sign-in to my Steam account
- Using Steam, why does my game take forever to “cache Vulkan shader” ?
- I have a black screen when I connect to my instance
- I Found an bug or I have a suggestion
- How does all of this work?
- Will Cloudy Pad become a paid product ?
- How are my data collected? How does analytics works?
- Known issues
What are the recommended GPU and specs for my instance ?
General recommendations:
- Choose a location or region as close as possible to you to avoid too much latency (eg. if you live in the US don’t create your instance in Europe)
- Just provision what you need for: don’t create a 500 GB disk if you intend to play a game that will only use 100 GB.
- GPU / machine type depends on the game you play. See below for recommendations.
AWS
xlarge instances should be enough for most usage. For instance, g4dn.xlarge can run Baldur’s Gate 3 in Ultra with 60 FPS 1080 without issues. Use a larger instance only if you have latency related to resource consumption.
Paperspace
Paperspace RTX4000 or P4000 or M4000 are relatively cheap and powerful enough for most use. A P4000 can run Baldur’s Gate 3 in Ultra with 60 FPS 1080 without issues.
Use higher-tier instance if you have latency related to resource consumption.
Azure
Use NC or NV instances with 4 to 8 CPUs, eg. one of:
- NC4as T4 v3 (4 CPU, 28 GB RAM)
- NC8as T4 v3 (8 CPU, 56 GB RAM)
- NV6ads A10 v5 (6 CPU, 55GB RAM)
Azure provide more opwerful instance but they are likely too expansive (providing lots of memory and ephemeral storage which is likely unused for gaming but expensive).
Azure gaming instances NG are not yet supported (they use AMD GPU while only NVIDIA is supported for now)
Google Cloud
Use N1 Standard instances with 4 to 16 CPUs with T4 or P4 GPUs. They are the cheapest while providing a good experience, eg. a P4 with 15GB RAM and 8 CPU can run Baldur’s Gate 3 in Ultra with 60 FPS.
Scaleway
Scaleway L4-1-24G (NVIDIA L4 GPU, 8 CPUs, 48 GB RAM) instances are great for gaming.
Scaleway also provide instances with multiple GPU or powerful and expensive GPUs like H100 but they may not be the best choice for gaming (expensive and not designed for gaming).
I can’t sign-in to my Steam account
Steam may prevent sign-in as it detect your server location is not your “usual” location. It’s recommended to use Steam Guard Mobile Authenticator to approve of your instance location: Steam sign-in tutorial
Using Steam, why does my game take forever to “cache Vulkan shader” ?
If this is the first time you run your game this is (unfortunately) expected. Steam may cache Vulkan shaders to optimize in-game performance. It should be faster on subsequent runs, if not instantaneous.
I have a black screen when I connect to my instance
If this is the first time you connect to your instance, it may take a few minutes to setup the required components. If after 5 min the problem persists, please file an issue.
I Found an bug or I have a suggestion
If you found a bug or have a suggestion, please report an issue. Thanks for your feedback !
How does all of this work?
cloudypad is a wrapper around a few technologies:
- Wolf gaming server
- Clouder-specific tools and APIs to deploy and manage Cloud machines
- When possible, Pulumi to deploy Cloud machines and resources
- Ansible to configure machines (drivers, gaming server, etc.)
- 🧠 Brain juice from me and other awesome open-source community members
Will Cloudy Pad become a paid product ?
Cloudy Pad is a Free and Open Source project. However it deploys Cloud resources on providers like AWS, Azure, Google Cloud, Scaleway etc. which are usually not free.
Cloudy Pad Platform provides an experience similar to other Cloud Gaming services, based on Cloudy Pad Open Source. Like a Cloud Provider, payment is done by the hour based on resource consumption.
Note from the creator: Considering I’m really not happy about the enshittification of the internet, Cloudy Pad will remain a Free and Open Source project along Cloudy Pad platform.
How are my data collected? How does analytics works?
Cloudy Pad may, with your consent, collect some personal information. Here’s the full list of information collected if you consent:
- OS name and details (distribution and version)
This data is only used internally and won’t be shared with third party or used for targeted ads. Your data are only used for analytics purpose to understand usage, track feature usage and help resolve issues.
Cloudy Pad will, by default, collect technical data such as when a command is run or certain technical event occurs, without collecting any personal information. Collected data:
- Cloudy Pad version
- Techical events (action performed such as instance start/stop without instance details, error without personal info, etc.)
To completely opt out of any data collection (even technical non-personal data) or change data collection method, open $HOME/.cloudypad/config.yml and set analytics.enabled: false, eg:
analytics:
  posthog:
    collectionMethod: none # <<===== EDIT HERE, valid value: "none", "technical", "all"
    distinctId: xxx
Cloudy Pad uses Post Hog and will keep data for 1 or 3 months.
To opt-out of analytics, either:
- Refuse analytics on initial installation
- Export environment variable
CLOUDYPAD_ANALYTICS_DISABLE=true - Edit local configuration at
$HOME/.cloudypad/config.ymland setanalytics.enabled: false
Known issues
Moved to known-issues.md
Known issues
Apple / MacOS
Docker for MacOS and VirtioFS
For MacOS, if your Docker installation use VirtioFS, Cloudy Pad may fail with a Docker-related error such as:
Error response from daemon: error while creating mount source path '/private/tmp/com.apple.launchd.ABCDEF/Listeners': mkdir /private/tmp/com.apple.launchd.ABCDEF/Listeners: operation not supported
This is a bug when using Docker for Mac VirtioFS file sharing with SSH agent. The bug is still being worked on, as a workaround you can either:
- Disable SSH agent before running Cloudy Pad, eg.
unset SSH_AUTH_SOCK - Switch Docker for Mac config to non-VirtioFS (eg. gRPC FUSE): go to config > Resources > File Sharing and update config.
Upgrade guide
On upgrade Cloudy Pad will ensure retrocompatibility as best as possible. However some features may remain disabled if you’re upgrading from an older version to avoid breaking changes or data loss.
Only changes requiring manual intervention are listed here. If not, upgrade process is transparent.
0.24.0 - Scaleway volume deprecation and data disk
This version introduces several changes for Scaleway
Scaleway legacy volume deprecation
Scaleway is deprecating b_ssd volumes support and you won’t be able to cloudypad provision existing Scaleway instances unless you upgrade your instance’s volume following Scaleway migration guide (Internet Archive link since original link is not available anymore).
Alternatively:
- Use
cloudypad configureinstead ofcloudypad provisionorcloudypad update- Note that it will not fully update your instance since provision will be skipped, but it should work nonetheless - Create a new instance (but you’ll need to reinstall your games)
Dedicated data disk for Scaleway instances
Dedicated data disk is a feature splitting OS (system) disk and data disk to improve maintenability and help with cost reduction (to avoid paying for OS disk while instance is stopped in later releases).
Older instances won’t enable dedicated data disk by default to keep retrocompatibility. To enable Scaleway dedicated Data disk:
- Migrate legacy root volume to new volume type (see above)
- Perform upgrade and update with
cloudypad configure- choose a 0 GB data disk size for now - SSH into your instance and move (not copy) folder
mv /var/lib/cloudypad/data /var/lib/cloudypad/data-backup - Run
cloudypad update scaleway --name my-instance --data-disk-size <size-gb>with your desired data disk size- This will create a new data disk and mount it in your instance at
/var/lib/cloudypad/data
- This will create a new data disk and mount it in your instance at
- SSH into your instance and move back data folder
mv /var/lib/cloudypad/data-backup /var/lib/cloudypad/data
You’re all done ! Your instance is now using a dedicated data disk.
How much will I pay ? 🫰
Cloudy-Pad is free and open-source; however, charges may apply when using a Cloud provider. Typically billed resources:
- Machine usage (GPU, CPU, RAM)
- Disk storage
- IP address reservation
- Past a certain time played per month, data transfer charges may apply (typically if you play 50h+ per months)
Cost estimations
Estimations for a setup with 8 CPUs, ~30GB RAM, 100GB Disk for 30 hours / month:
- Google Cloud: ~$15.68 (n1-standard-8 with NVIDIA T4000)
- AWS: ~$15.67 (g4dn.2xlarge with NVIDIA T4000)
- Azure: ~$11.06 (NC8as T4 v3 with NVIDIA T4000)
- Paperspace: ~$22.30 (NVIDIA P4000, a bit more powerful than T4000)
See per cloud providers estimations:
Cost optimizations
Some general recommandations to avoid unnecessary costs
Spot instances
💸 It’s recommenced to use Spot instances as they are 30% to 90% cheaper ! As Spot instances interrupton is generally low, you probably won’t get interruped during your session. However, make sure to save often nonetheless 😉
Spot instances are supported for Cloud providers:
- AWS
- Azure
- Google Cloud
Paperspace doesn’t support Spot instances.
Spot instance usage is specified during instance creation with cloudypad create - you’llbe prompted for Spot instance usage, or you can use flag cloudypad create <provider> --spot for providers supporting Spot instances.
To have a better understand about spot instances, see this article.
Egress (sending data out to Internet from Cloud provider network)
Most clouders (including AWS, Azure and GCP) will charge for Egress traffic (outgoing traffic from their network to the internet) past a certain threshold. Cloudy Pad incurs egress traffic as video stream will be sent from Clouder network to internet on your machine.
Egress charges may apply typically after 50 hours / month with a 1080p 60FPS streaming setup - time varies depending on your setup and Cloud provider used. See Clouder cost recommandations for details.
You can limit your instance network speed with options --ratelimit-max-mbps available on cloudypad create or cloudypad update. It sets a network speed limit in megabit per seconds, for example:
# Example create
cloudypad create aws --name my-instance \
  --ratelimit-max-mbps 20
  # ...

# Example update
cloudypad update aws --name my-instance \
  --ratelimit-max-mbps 20
This may impact performance. Recommended rate limit for streaming performances:
| Rate limit | Resolution | Frame Rate |
|---|---|---|
| 10 Mbps | 720p | 30 FPS |
| 20 Mbps | 1080p | 60 FPS |
| 40 Mbps | 1440p | 100 FPS |
| 80 Mbps | 4K | 120 FPS |
Read this table as: 20 Mbps rate limit will let you have good performances with 1080p / 60 FPS, but may not work well with higher specs.
Instance setup and specs recommandations
- Choose a location or region as close as possible to you to avoid too much latency (eg. if you live in the US don’t create your instance in Europe)
- Just provision what you need for: don’t create a 500 GB disk if you intend to play a game that will only use 100 GB.
- GPU / machine type depends on the game you play. Some game will run fine with 4 CPUs but needs high amount of memory such as 32 GB and more, while other will run fine with 4 GB memory but require lots of CPU or a stronger GPU. Refer to requirements and recommended settings for your game.
Turn off your instance while not in use
That goes without saying, remember to turn off your instance while you’re not using it to avoid unnecessary costs:
cloudypad stop mypad
AWS costs
Monthly cost estimations
Cloudy-Pad is free and open-source; however, charges may apply when using a Cloud provider. Typically billed resources:
- Machine usage (GPU, CPU, RAM)
- Disk storage
- IP address reservation
💸 It’s recommenced to use Spot instances as they are 30% to 90% cheaper ! As Spot instances interrupton is generally low, you probably won’t get interruped during your session. However, make sure to save often nonetheless 😉
Example: using a g4dn.xlarge (16 GB RAM, 4 CPUs, NVIDIA T4) Spot instance for 10 hours / month would cost approximatively 9.63$ / month.
| Instance type | RAM (GB) | CPUs | GPU | Spot ? | Disk size | Instance $ / h | h / month | Compute $ / month | Disk / month $ | Total $ / month |
|---|---|---|---|---|---|---|---|---|---|---|
| g4dn.xlarge | 16 | 4 | NVIDIA T4 | Yes | 100 | $0.163 | 10 | $1.63 | $8.00 | $9.63 |
| g4dn.2xlarge | 32 | 8 | NVIDIA T4 | Yes | 100 | $0.256 | 30 | $7.67 | $8.00 | $15.67 |
| g5.2xlarge | 32 | 8 | NVIDIA A10G | Yes | 250 | $0.412 | 30 | $12.36 | $20.00 | $32.36 |
| g6.2xlarge | 32 | 8 | NVIDIA L4 | Yes | 250 | $0.391 | 30 | $11.73 | $20.00 | $31.73 |
| g4dn.xlarge | 16 | 4 | NVIDIA T4 | No | 100 | $0.526 | 10 | $5.26 | $8.00 | $13.26 |
| g4dn.2xlarge | 32 | 8 | NVIDIA T4 | No | 100 | $0.752 | 30 | $22.56 | $8.00 | $30.56 |
| g5.2xlarge | 32 | 8 | NVIDIA A10G | No | 250 | $1.212 | 30 | $36.36 | $20.00 | $56.36 |
| g6.2xlarge | 32 | 8 | NVIDIA L4 | No | 250 | $0.978 | 30 | $29.33 | $20.00 | $49.33 |
*Estimations based on AWS eu-east-1 pricing as of September 2024. Exact prices may vary over time and by region.
Egress costs - Data transfer out from Amazon to Internet
AWS bills data transfer out to internet past a 100GB free data threshold. As Cloudy Pad streams from AWS to your machine via internet, you may be billed for data transfer past a certain usage. AWS bills 0.09$ per GB in most regions after the free threshold.
Past 20 or 30 hours per month, AWS may start billing additional data transfer charges.
Considering a 1080p 60 FPS stream at 15 Mbps, data transfer would be around 6.75 GB/hr, incuring additional cost depending on time played:
| Time played / month (h) | 10 | 20 | 40 | 50 | 60 | 100 |
|---|---|---|---|---|---|---|
| Data transfered (GB) | 67.50 | 135.00 | 270.00 | 337.50 | 405.00 | 675.00 |
| Cost ($) | $0.00 | $3.15 | $15.30 | $21.38 | $27.45 | $51.75 |
Azure costs
Monthly cost estimations
Cloudy-Pad is free and open-source; however, charges may apply when using a Cloud provider. Typically billed resources:
- Machine usage (GPU, CPU, RAM)
- Disk storage
- IP address reservation
💸 It’s recommenced to use Spot instances as they are 30% to 90% cheaper ! As Spot instances interrupton is generally low, you probably won’t get interruped during your session. However, make sure to save often nonetheless 😉
Example: using an NV6ads A10 v5 (35 GB RAM, 6 CPUs, 1/6 NVIDIA A10) Spot instance with 100 GB disk for 10 hours / month would cost approximatively 9.24$ / month.
| Instance type | RAM (GB) | CPUs | GPU | Spot ? | Disk size | Instance $ / h | h / month | Compute $ / month | Disk / month $ | Total $ / month |
|---|---|---|---|---|---|---|---|---|---|---|
| NV6ads A10 v5 | 55 | 6 | 1/6 NVIDIA A10 | Yes | 100 | $0.114 | 10 | $1.14 | $8.10 | $9.24 |
| NC8as T4 v3 | 56 | 8 | NVIDIA T4 | Yes | 100 | $0.099 | 30 | $2.96 | $8.10 | $11.06 |
| NC16as T4 v3 | 110 | 16 | NVIDIA T4 | Yes | 250 | $0.158 | 30 | $4.73 | $20.25 | $24.98 |
| NV6ads A10 v5 | 55 | 6 | 1/6 NVIDIA A10 | No | 100 | $0.454 | 30 | $13.62 | $8.10 | $21.72 |
| NC8as T4 v3 | 56 | 8 | NVIDIA T4 | No | 100 | $0.752 | 30 | $22.56 | $8.10 | $30.66 |
| NC16as T4 v3 | 110 | 16 | NVIDIA T4 | No | 250 | $1.200 | 30 | $36.00 | $20.25 | $56.25 |
*Estimations based on Azure US pricing as of September 2024. Exact prices may vary over time and by region.
Egress costs - Data transfer out from Azure to Internet
Azure bills data transfer out to internet past a 100GB free data threshold. As Cloudy Pad streams from Azure to your machine via internet, you may be billed for data transfer past a certain usage. Azure bills 0.08$ to 0.12$ per GB depending on your localisation after the free threshold.
Considering a 1080p 60 FPS stream at 15 Mbps, data transfer would be around 6.75 GB/hr, incuring additional cost depending on time played:
| Time played / month (h) | 10 | 20 | 40 | 50 | 60 | 100 |
|---|---|---|---|---|---|---|
| Data transfered (GB) | 67.50 | 135.00 | 270.00 | 337.50 | 405.00 | 675.00 |
| Cost ($) | $0.00 | $2.80 | $13.60 | $19.00 | $24.40 | $46.00 |
Google Cloud Platform costs
Monthly cost estimations
Cloudy-Pad is free and open-source; however, charges may apply when using a Cloud provider. Typically billed resources:
- Machine usage (GPU, CPU, RAM)
- Disk storage
- IP address reservation
💸 It’s recommenced to use Spot instances as they are 30% to 90% cheaper ! As Spot instances interrupton is generally low, you probably won’t get interruped during your session. However, make sure to save often nonetheless 😉
Example: using a n1-standard-4 (15 GB RAM, 4 CPUs, NVIDIA T4) Spot instance with 100 GB disk for 10 hours / month would cost approximatively 11.54$ / month.
| Instance type | RAM (GB) | CPUs | GPU | Spot ? | Disk size | Instance $ / h | GPU $ / h | h / month | Compute $ / month | Disk $ / month | Total $ / month |
|---|---|---|---|---|---|---|---|---|---|---|---|
| n1-standard-4 | 15 | 4 | NVIDIA T4 | Yes | 100 | $0.035 | 0.119 | 10 | $1.54 | $10.00 | $11.54 |
| n1-standard-8 | 30 | 8 | NVIDIA T4 | Yes | 100 | $0.070 | 0.119 | 30 | $5.68 | $10.00 | $15.68 |
| n1-standard-8 | 30 | 8 | NVIDIA T4 | Yes | 250 | $0.070 | 0.119 | 30 | $5.68 | $25.00 | $30.68 |
| n1-standard-8 | 30 | 8 | NVIDIA P4 | Yes | 100 | $0.070 | 0.240 | 30 | $9.31 | $10.00 | $19.31 |
| n1-standard-8 | 30 | 8 | NVIDIA P4 | Yes | 250 | $0.070 | 0.240 | 30 | $9.31 | $25.00 | $34.31 |
| n1-standard-4 | 15 | 4 | NVIDIA T4 | No | 100 | $0.220 | 0.350 | 10 | $5.70 | $10.00 | $15.70 |
| n1-standard-8 | 30 | 8 | NVIDIA T4 | No | 100 | $0.440 | 0.350 | 30 | $23.70 | $10.00 | $33.70 |
| n1-standard-8 | 30 | 8 | NVIDIA T4 | No | 250 | $0.440 | 0.350 | 30 | $23.70 | $25.00 | $48.70 |
| n1-standard-8 | 30 | 8 | NVIDIA P4 | No | 100 | $0.440 | 0.600 | 30 | $31.20 | $10.00 | $41.20 |
| n1-standard-8 | 30 | 8 | NVIDIA P4 | No | 250 | $0.440 | 0.600 | 30 | $31.20 | $25.00 | $56.20 |
Instances used for estimation: N1 Standard. Estimations based on Google Cloud on-demand and spot us-central-1 as of September 2024. Exact prices may vary over time and by region.
Egress costs - Data transfer out from Google to Internet
Google bills data transfer out to internet past a 200GB free data threshold. As Cloudy Pad streams from Google to your machine via internet, you may be billed for data transfer past a certain usage. Google bills 0.085$ per GB up to 10 TB after the free threshold.
Considering a 1080p 60 FPS stream at 15 Mbps, data transfer would be around 2.25 GB/hr. Past 40 hours per month, Google may start billing additional data transfer charges:
| Time played / month (h) | 10 | 20 | 40 | 80 | 90 | 100 |
|---|---|---|---|---|---|---|
| Data transfered (GB) | 67.50 | 135.00 | 270.00 | 540.00 | 607.50 | 675.00 |
| Cost ($) | $0.00 | $0.00 | $5.95 | $28.90 | $34.64 | $40.38 |
Paperspace costs
ℹ️ Cloudy Pad Paperspace provider is deprecated. No new feature will be added and support will be dropped in a later version.
Monthly cost estimations
Cloudy-Pad is free and open-source; however, charges may apply when using a Cloud provider. Typically billed resources:
- Machine usage (GPU, CPU, RAM)
- Disk storage
Example: Using a P4000 with 30 GB RAM, 8 CPU and 100 GB disk for 10 h / month will cost approximatively 12.10$.
| Instance type | RAM (GB) | CPUs | Disk size (GB) | Instance $ / h | h / month | Disk / month $ | Total $ / month |
|---|---|---|---|---|---|---|---|
| P4000 | 30 | 8 | 100 | $0.510 | 10 | $7.00 | $12.10 |
| P4000 | 30 | 8 | 100 | $0.510 | 30 | $7.00 | $22.30 |
| RTX4000 | 30 | 8 | 100 | $0.560 | 30 | $7.00 | $23.80 |
| P5000 | 30 | 8 | 250 | $0.780 | 30 | $10.00 | $33.40 |
| RTX5000 | 30 | 8 | 250 | $0.820 | 30 | $10.00 | $34.60 |
*Estimations based on Paperspace pricing as of September 2024. Exact prices may vary over time and by region.
Egress costs - Data transfer out from Paperspace to Internet
Paperspace does not charge for data transfer. (or it’s not documented on their pricing page)
Scaleway costs
Monthly cost estimations
Cloudy-Pad is free and open-source; however, charges may apply when using a Cloud provider. Typically billed resources:
- Machine usage (GPU, CPU, RAM)
- Disk storage
More information on Scaleway pricing
More details coming soon.
Egress costs - Data transfer out from Scaleway to Internet
Scaleway charges for data transfer out from Scaleway to Internet. As of 2025-03-09, data transfer costs €0.000118/GB/hour
More information on Scaleway Storage pricing
More details coming soon.
Contribution Guide
Thanks for considering contributing to Cloudy Pad! This guide will help you get started contributing to various parts of the project.
Here’s a typical workflow outline for contributions:
- Understand project architecture
- Fork Cloudy Pad on GitHub or clone project locally
- Setup your development environment
- Development environment setup is fully automated! Don’t worry about tooling installation and setup
- Write code
- Use of AI is encouraged, we provide contextual AI
AGENTS.mdand Cursor rules files. - You can also pass this contribution guide directly to AI context
- Make sure to review and test your code before going forward though. Unsupervised IA contribution are unlikely to pass review.
- Use of AI is encouraged, we provide contextual AI
- Run tests and review
- A simple
task test-unitand human is enough for most situations - Detailed testing and debugging instructions are provided for more complex situation
- A simple
- Submit Pull Request
Table of Content
- Getting started: setup development environment, build and run tests
- Architecture Overview
- Using AI is encouraged - with caveats
- Where and how to contribute ?
- Updating a provider (AWS, Azure, GCP, etc.)
cloudypadCLI: fixing bugs, adding arguments, etc.- Instance configuration: NVIDIA driver install, Sunshine / Wolf deployment, etc. via Ansible Playbook
- Documentation, troubleshooting guide and other non-code related tasks
- Cloudy Pad desktop and Sunshine server container image (Docker)
- Running / writing tests and verifying your changes locally
- Debugging
- Create a Pull Request with your changes
- Useful commands
- Get help on Discord !
Getting started: setup development environment, build and run tests
A fully automated development environment is provided by Nix Flake (see flake.nix at project root). It will setup the required tools with desired versions in a kind of virtual development environment which will not impact or change your own tool version anywhere else on your machine.
You only need to install:
Start a Nix development shell: it will download packages and setup your development environment. The first run may take some time - don’t worry subsequent runs are almost instantaneous:
nix develop
You can then run commands:
# Build Node CLI package
task build-pnpm

# Run unit tests
task test-unit
Most commands are wrapped as a task - See Taskfile.yml at project root.
You’re ready to contribute !
Architecture Overview
Using AI is encouraged - with caveats
You are encouraged to use AI to contribute to Cloudy Pad. AGENTS.md-like files are present under .cursor/rules - make sure to include them. They describe expected best practices and context for AI to better understand the project.
Please note:
- Even though AI use is encouraged, please review your code and follow best practices
- Do not contribute a PR without reviewing and testing your changes. A PR with low-effort and/or broken AI-generated code will slow down the merging process
Where and how to contribute ?
Depending on your contribution, here are various guides to get started: where is code located, guidelines to get started in code and various tips.
Make sure to read Architecture overview first 😉
Updating a provider (AWS, Azure, GCP, etc.)
Providers are located under src/providers/<provider> with a similar structure. You might want to
- Update infrastructure used for provider in
pulumi.ts - Improve CLI arguments and prompting for a provider in
cli.ts
See Architecture and Provider implementation to get a better understanding of Providers.
cloudypad CLI: fixing bugs, adding arguments, etc.
CLI entrypoint is src/cli/main.ts. CLI is constructed by:
- Building
Commandsobjects based on common arguments (as often same arguments are present in multiple commands) program.tsdescribes various commands and available optionsinitializer.tsandupdater.tsare wrappers around their Core equivalents to prompt users for specific details duringcloudypad createandcloudypad update
On running CLI:
- CLI args are parsed into a
CliArgsinterface CliArgsis transformed into a Core interfaceInstanceInputsdescribing inputs (~configurations) for an instance byprompter.tscliArgsIntoPartialInput()
To add or update CLI arguments you can:
- Add/update arguments in main program
- You may also need to update provider-specific
cli.ts, e.g.src/providers/aws/cli.tsfor AWS. These files define CLI arguments specific to each provider.
- You may also need to update provider-specific
- Update
prompter.tsto pass new arguments intoInstanceInputs - If needed, update
prompter.ts:completeCliInput()to prompt the user for input if missing from CLI args - From this point on,
InstanceInputsare passed through to internal components. You can now change code to use your changes.
Instance configuration: NVIDIA driver install, Sunshine / Wolf deployment, etc. via Ansible Playbook
Ansible (an Infrastructure as Code tool) is used to configure instances via playbooks in ansible/.
You can update playbook to:
- Change how NVIDIA drivers are installed
- Update Sunshine server setup
- Update Wolf server setup
- Customize per-provider behavior (e.g. package installation, add exceptions for some providers)
- Manage auto-stop mechanism (detect inactivity to automatically stop instance, avoiding unwanted Cloud cost)
Documentation, troubleshooting guide and other non-code related tasks
Documentation at https://docs.cloudypad.gg is auto-generated from Markdown files under docs/src.
- Updating existing files: on merge, the documentation will be updated
- Adding new files: make sure to reference them in
docs/src/SUMMARY.mdto have them included
Run a local doc server to see the result of your updates via http://localhost:3000:
task mdbook-server
Cloudy Pad desktop and Sunshine server container image (Docker)
The Sunshine streaming server or desktop container is what you see when you connect to Cloudy Pad via Moonlight (using Sunshine streaming server). Source code is located at containers/sunshine
Container is roughly built by:
- Installing a desktop environment on an Ubuntu base image
- Installing game launchers: Steam, Heroic, etc.
- Installing various tools and libraries (Proton, text editor, etc.)
- Adding an overlay with various scripts and default config (Sunshine server config template, desktop environment config, etc.)
On startup, container starts Sunshine, the desktop and all required components.
Running / writing tests and verifying your changes locally
You’ll want to test your changes and verify them along the way. Typical ways include:
Running tests
Running unit tests:
task test-unit
Building application (plain node build or Docker build):
# Node build
task build-pnpm

# CLI Docker container build
task build-core-container-local
Running the CLI directly from your code - e.g. deploy an instance to verify your changes are applied correctly:
# Equivalent of `cloudypad --help` for development
npx tsx src/cli/main.ts --help

# Create a test instance
npx tsx src/cli/main.ts create aws my-test-instance [...]
See examples of fully automated instance deployment via CLI in test/integ/unstable/cli-full-lifecycle
Adding and writing tests
Cloudy Pad has several layer of tests - most of them run on CI:
Unit tests
Run unit tests via task test-unit. Unit tests are under test/unit and follow these global coding practices:
- Use Mocha for testing
Teststructure matchessrcstructure, e.g.src/core/manager.tsis tested viatest/unit/core/manager.spec.ts- Each test is self-contained. A test should not change or update data, variable or context which is also used by another test. If test needs setup (such as an existing instance State file), test setup should be done either in the
it()function or in a before hook. - Avoid using
beforein a spec file to set a global variable used by all tests. Prefer generating data in each test. - Do not hesitate to look at similar tests to match their structure
About side effects:
- You must avoid side effects with unit tests (e.g. don’t contact an external service or a database, etc.). Writing local files is accepted, but the method must guarantee proper reproducibility and debugging analysis (e.g. don’t write a temporary test that can’t be verified if something happens)
- If the component under tests relies on side effect, use Sinon to stub calls causing side effect
- See
test/unit/hooks.tsfor globally defined stubs, e.g. for Pulumi or AWS clients
Unit tests have a few utility functions in test/unit/utils.ts to help:
createDummyState()- Create dummy instance State for testing with optional overridesinitializeDummyInstanceState()- Initialize a dummy instance state and return itDEFAULT_COMMON_INPUT- Instance inputs to use during test require Inputs or StateDEFAULT_COMMON_CLI_ARGS- CLI argument matching DEFAULT_COMMON_INPUTcreateTempTestDir(prefix)- Create temporary directory for testinggetUnitTestCoreClient()- Create a Core client suitable for testing with local data backendgetUnitTestCoreConfig()- Create CoreConfig with local state backend for testinggetUnitTestDummyProviderClient()- Create a dummy ProviderClient for testing
Integration tests
Stable integration tests are under test/integ/stable - they create real Cloud infrastructure to test instance lifecycles. They are not currently run on CI, only locally using your own credentials.
⚠️ Make sure to understand what these tests are doing before running them.
Example:
# Run all integration tests
task test-integ-stable

# Run a specific provider integration tests
test-integ-provider-scaleway
Other tests
Various tests on CI also:
- Check documentation and dead links
- Verify build, compilation and linting
- Verify installation script
You can run them as task locally if CI reports issues.
Debugging
Various debugging methods:
CLI log level
Set environment variable export CLOUDYPAD_LOG_LEVEL=2 (DEBUG) or 3 (INFO) to show more information
Ansible playbook
Ansible playbook is written locally under a temp directory at runtime. Ansible playbook path is shown at DEBUG log level. To debug configuration more easily:
- Run a deployment or configuration command, e.g.
CLOUDYPAD_LOG_LEVEL=2 npx tsx src/cli/main.ts configure my-instance - Logs will show something like
2025-10-09 14:14:18.448 DEBUG src/tools/ansible.ts:15 AnsibleClient Ansible command: ansible-playbook ["-i","/tmp/nix-shell.iuM9BJ/cloudypad-qBivGz/inventory.yml","/home/me/cloudypad/ansible/sunshine.yml","-e","'ansible_ssh_common_args=\"-o StrictHostKeyChecking=no\"'"]
- Use or edit Ansible playbook directly and run:
ansible-playbook -i /tmp/nix-shell.iuM9BJ/cloudypad-qBivGz/inventory.yml ansible/sunshine.yml
Local Pulumi stack manipulation
Nix development shell automatically sets PULUMI_BACKEND_URL and PULUMI_CONFIG_PASSPHRASE environment variables, allowing you to manipulate Pulumi stacks locally.
# List stacks
pulumi stack ls -a

# Show stack resources
pulumi stack -s <organization/CloudyPad-XXX/STACK> --show-ids

# Destroy stack
pulumi destroy -s <organization/CloudyPad-XXX/STACK>
Local Virtual Machine as Cloudy Pad instance
A local debug Virtual Machine (VM) can be set up with Vagrant and Vagrantfile. This machine matches a real-world Cloudy Pad instance except it does not use provisioning and may not have an available GPU (Cloudy Pad still works using CPU encoding).
Local VM goals:
- Test changes impacting configuration, typically:
- Changes to Ansible Playbook in
ansible/ - Changes to Sunshine container image (Docker image) in
containers/
Local VM setup
Debug VM can be setup with:
# Create VM
vagrant up

# Run configuration from Ansible playbook
task dev-ansible-config

# Might fail as :local tag doesn't exist
# Push local container image to VM
task dev-docker-sunshine-to-vm
Using local VM
Instance is reachable via 192.168.56.43.
To pair, connect to the Sunshine web UI and use Moonlight manually:
# A TLS certificate warning is shown as certificate is self-signed
# login: sunshine
# password: @!/:,?!*#'€`_\µ$="foo
#   or 'sunshine'
https://192.168.56.43:47990/
Debug container and Dockerfile changes
During Sunshine container development, it’s possible to use a Vagrant-specific Docker Compose which will mount folders from the host machine directly in the Cloudy Pad container.
For example, if you change containers/sunshine/overlay/cloudy/conf/sunshine/sunshine.conf.template locally, you don’t need to rebuild the container image, you can mount this file directly in the VM container for faster testing:
- Update
test/resources/docker-compose.vagrant.ymlto mount desired files, for example:
  volumes:
  # [...]
  #
  # Mount local containers/sunshine/overlay/cloudy/conf/sunshine/sunshine.conf.template
  # Local project is mounted at /vagrant, hence using /vagrant/<project/path>
  #
  - "/vagrant/containers/sunshine/overlay/cloudy/conf/sunshine/sunshine.conf.template:/cloudy/conf/sunshine/sunshine.conf.template"
- Update container with custom mounts
vagrant ssh
$ docker compose -f /vagrant/test/resources/docker-compose.vagrant.yml -p sunshine up -d --force-recreate
Connect to Cloudy Pad VM and container
To connect via SSH on instance, see: Connect via SSH
Debug Proton / Wine and game run
To run directly Proton or Wine and see how it behaves, first run the game in a standard way and re-use the same command to reproduce issue or situation.
Identify process running game, then get their env variables:
ps -ef

GAME_PID=1234 cat proc/$GAME_PID$/environ | tr '\0' '\n'
Steam specifics: variables we want to re-use:
export STEAM_COMPAT_CLIENT_INSTALL_PATH="/cloudy/data/Steam"
export STEAM_COMPAT_DATA_PATH="/cloudy/data/Steam/steamapps/compatdata/1903340"
Then run game manually (re-use actual command), eg.:
python3 "/cloudy/data/Steam/steamapps/common/Proton 10.0/proton" waitforexitandrun "C:\\windows\\system32\\cmd.exe" /c "path/to/game.exe"
Example for Steam with Expedition 33:
python3 /cloudy/data/Steam/steamapps/common/Proton 10.0/proton waitforexitandrun /cloudy/data/Steam/steamapps/common/Expedition 33/Expedition33_Steam.exe
Debug process CPU usage or affinity
Specific instructions to debug CPU usage, especially linked to CPU affinity. (eg. for #335)
# Show all process
ps -ef

# Show process using NVIDIA GPU
nvidia-smi

# Show process CPU affinity
taskset -pc PID
Debug process environment variable
cat /proc/5096/environ | tr '\0' '\n'
Enable debug log with Steam and Proton
Connect on instance and docker exec -it -u cloudy cloudy bash to run a shell in container as cloudy user, then run Steam directly:
STEAM_LINUX_RUNTIME_LOG=1 STEAM_LINUX_RUNTIME_VERBOSE=1 PRESSURE_VESSEL_VERBOSE=1 PROTON_LOG=1 PROTON_LOG_DIR=/tmp steam
Possibly also add (as per Steam debug logging instructions ):
CAPSULE_DEBUG=all
G_MESSAGES_DEBUG=all
Create a Pull Request with your changes
When your changes are ready, you can create a Pull Request. Please make sure to:
- Follow conventional commits
- Eg. commit messages like
feat: added a nice feature - See Git history as example
- Eg. commit messages like
- Verify your code: test, compilation, review, etc.
- Explain your changes
Review process
Once your PR is created you should get an update within 3 days. If your PR is not acknowledged, please ping Pierre.
While we’ll do our best to merge your code ASAP, review process may take a bit of time and typically involves:
- Questions about your code
- Fixing a few things like design, refactoring, or adding tests
Useful commands
Taskfile contains lots of commands available in development (see comments on tasks). Run with task xxx, e.g.:
task test-unit
Get help on Discord !
Get in touch on Discord to get help for contributing - we’ll happily guide you through !
Cloudy Pad architecture overview
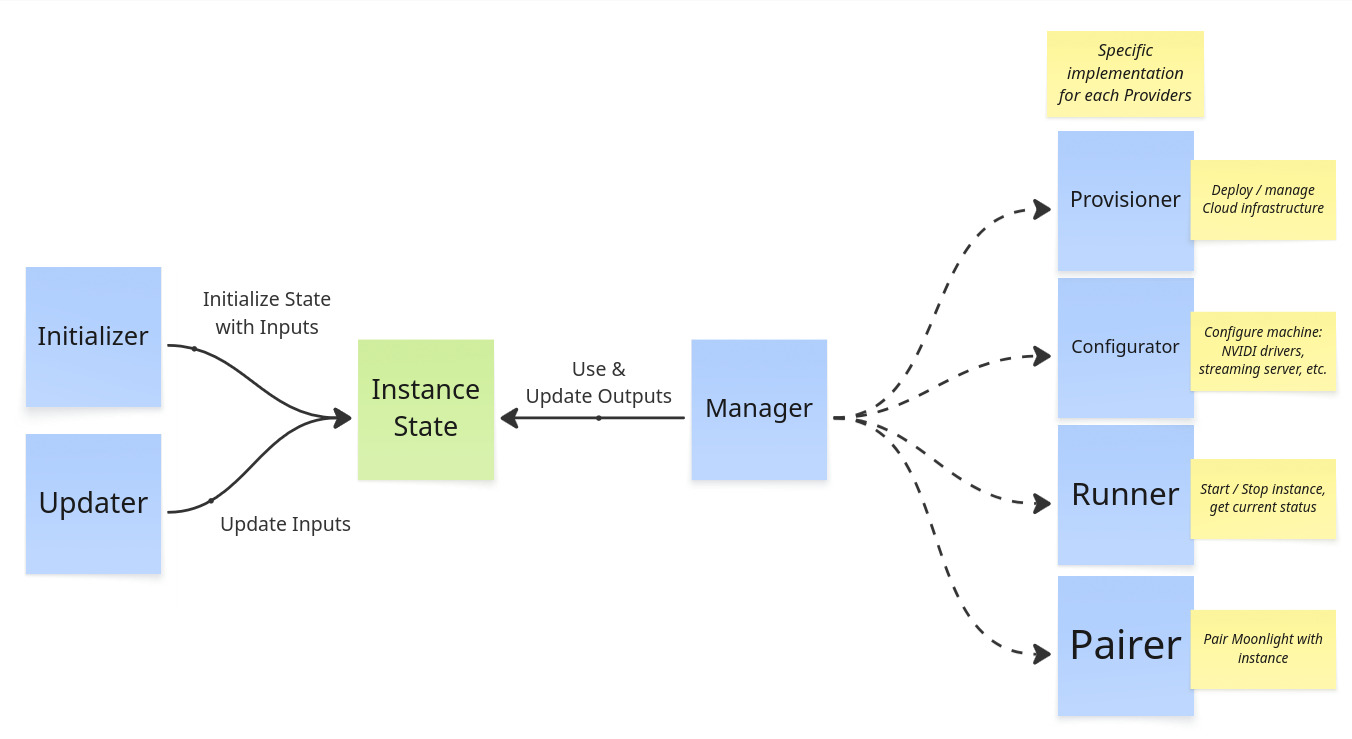
Cloudy Pad code has 3 main parts:
- Core - Internal components to manage instances and deployment
- Provider implementations - implementation of instance deployment and management for various Providers
- A Provider is a specialization of Core components to deploy instances in a given context
- For example
awsProvider is the implementation of instance deployment on AWS (Amazon Web Services)
- CLI - Wrapper around Core components to provide the Cloudy Pad CLI with interactive prompts
Instance lifecycle and Core components
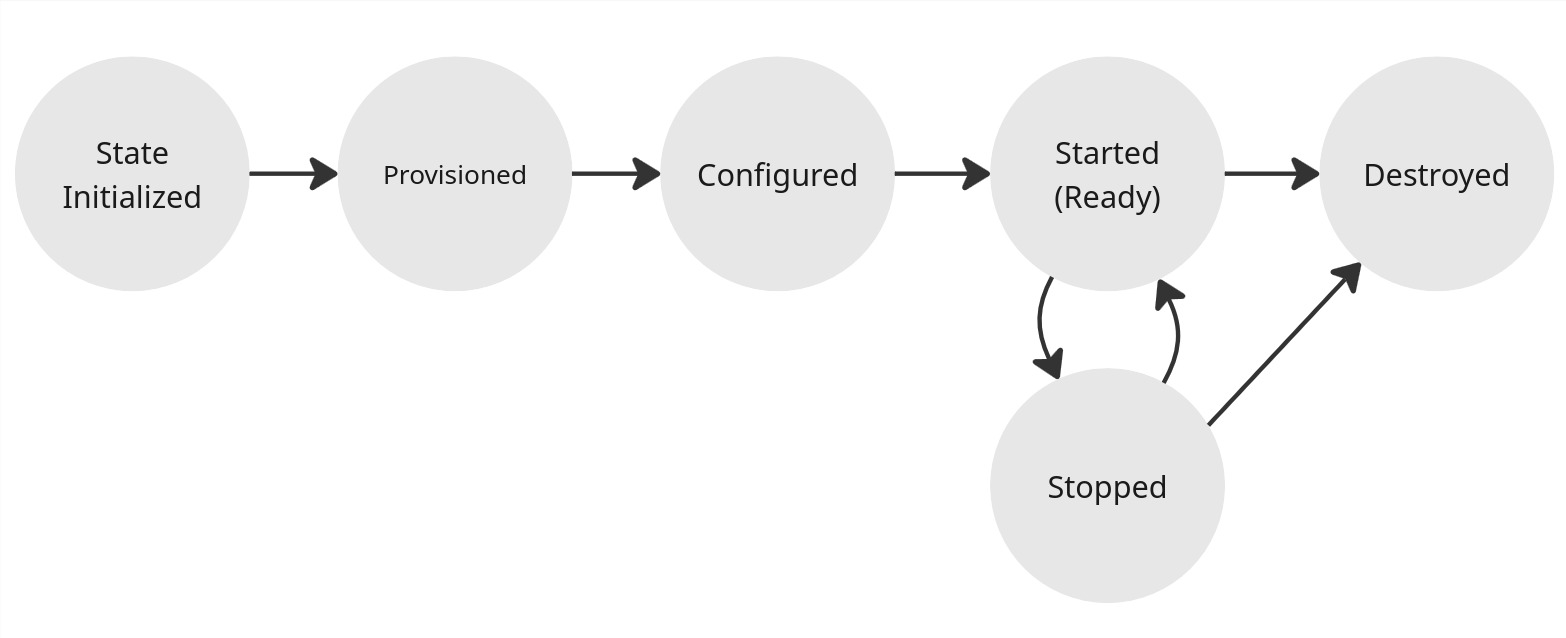
Instance lifecycle:
Initialization (or creation)
An Instance State is initialized with various Inputs (e.g. provider, region, instance type and specs, etc.). On initialization, the instance is:
- Provision - Cloud infrastructure is provisioned (creation of virtual machine, disk storage, etc. for instance) - most of the time with Pulumi (an Infrastructure as Code tool). Note a Cloud infrastructure is not always required, such as with SSH provider, in which case provisioning is no-op.
- Configuration - Installation of OS-level components: NVIDAI drivers, Sunshine / Wolf streaming server, etc. via Ansible (an Infrastructure as Code tool)
- Pairing - Instance is paired with Moonlight client
These steps can also be run separately (e.g. cloudypad provision)
Related code:
core/initializer.ts-InstanceInitializer- Manage overall initialization and deployment withInstanceManagercore/manager.ts-InstanceManager- manages instance lifecycle with:core/provisioner.ts-InstanceProvisionercore/configurator.ts-InstanceConfiguratorcore/moonlight/pairer.ts-MoonlightPairer
Usage lifecycle: start and stop
After initilialization, instance can be started and stopped.
Related code:
core/manager.ts-InstanceManager- manages instance lifecycle withRunner.core/runner.ts-InstanceRunner- Manages instance start/stop actions
Deletion
Destroy instance. Instance deletion deletes infrastructure (instance, disk, etc.) and related Instance State
Related code:
core/manager.ts-InstanceManager- manages instance lifecycle withRunner.core/provisioner.ts-InstanceProvisioner
Instance State
The Instance State represents the state in which an instance is. It roughly contains:
- Instance name
- Provider name (AWS, Azure, etc.)
- Inputs: desired instance configurations (instance type, region, streaming server, etc.)
- Outputs: actual infrastructure state (disk storage unique ID, IP address, etc.)
Each Provider implements its own state interface based on a common State implementation. State is by default persisted as a local YAML file under ~/.cloudypad/instance/<name>/state.yml
Example State file:
name: aws-instance
version: '1'

# Provision inputs and outputs
provision:
  provider: aws # provider name

  # Desired instance state for AWS
  input:
    diskSize: 200
    instanceType: g4dn.2xlarge
    publicIpType: static
    region: eu-central-1
    ssh:
      user: ubuntu
      privateKeyContentBase64: xxx

  # Actual infrastructure state
  # for AWS, host is instance static IP address and instanceId the EC2 instance ID
  output:
    host: 18.199.182.227
    instanceId: i-0ae901f1799b17fdf

# Configuration inputs and outputs
# used to configure instance
configuration:
  configurator: ansible
  input:
    sunshine:
      enable: true
      passwordBase64: xxx
      username: sunshine
As state is written and read externally, Zod is used to enforce TypeScript typing.
See src/core/state
Provider implementation
A Provider is a specialization of Core components to deploy instances in a given context (usually a Cloud provider). For example aws Provider is the implementation of instance deployment on AWS (Amazon Web Services).
Each provider is based on the same pattern. Example for AWS provider in src/providers/aws:
pulumi.ts- Pulumi is an Infrastructure as Code and provisioning tool (like Terraform) to manage Cloud resources. This file defines the Stack program used for each provider.state.ts- ExtendsInstanceStateV1with Inputs and Outputs specific to this providerprovisioner.ts- ImplementsInstanceProvisionerfor this provider. Use State Inputs to configure and run Pulumi stacks (or create infra with Provider API directly)runner.ts- ImplementsInstanceRunnerfor this provider. Use a Provider specific client to call Provider API to start/stop/… instance infrastructure.cli.ts- CLI implementation for this provider. Define Provider specific CLI args and command implementation (e.g.createarguments which are specific per providers)sdk-client.ts- or in aclient/folder. Provider specific SDK clients to interact with various resources (get server status, list available regions, etc.)
More internal-oriented files:
provider.ts- ImplementsProviderClientfor this Provider.factory.ts- ImplementsProvisionerFactoryfor this Provider.
Extend and customize Cloudy Pad container images
Cloudy Pad rely on Docker to run your games and streaming server. You can extend and customize the container images to fit your needs.
This section assumes you know about Docker, Docker Compose and Docker image build.
Sunshine
Create a Dockerfile such as:
# Use the same version returned by cloudypad --version
FROM ghcr.io/pierrebeucher/cloudypad/sunshine:0.19.0

# Example: add custom packages
RUN --mount=type=cache,target=/var/cache --mount=type=tmpfs,target=/var/log \
    apt update && \
    apt install -y my-package another-package && \
    apt clean

#
# Add other instructions...
#
Build and push your image, for example:
docker buildx build . -t your-registry/cloudypad-custom:some-tag
docker push your-registry/cloudypad-custom:some-tag
Update the Cloudy Pad Sunshine image used by your instance:
cloudypad update aws my-instance \
    --sunshine-image-registry your-registry/cloudypad-custom \
    --sunshine-image-tag some-tag
During development you’ll probably need to update your image often to test changes. For faster feedback loop:
- Build and push your image
- Connect to instance via SSH,
cd sunshineand run:docker-compose -f docker-compose.yml -f docker-compose.nvidia.yml up -d --pull always
This will update your instance to use your custom image without having to run entire cloudypad update.
Wolf
Wolf Docker images are based on GoW images. They are not maintained by Cloudy Pad but instruction can be found here to create custom images. You can then update configuration directly in your instance at /etc/wolf/cfg following Wolf configuration instructions
Note: Wolf custom image is not fully supported yet. On next Cloudy Pad update or cloudypad configure run your Wolf config will be overwritten with a custom template. Use this only for development or experimental purposes.
License
Cloudy Pad is licensed under GNU General Public License v3.0